Modern computers are often coming with a small solid state drive (SSD) for the primary operating system (OS) and then an additional standard or physical hard drive to provide more storage. Since SSDs are typically much smaller than their non-solid state counterparts, this can cause problems with the SSD drive running out of space. This issue isn’t just applicable to SSDs though. This can apply to any system where there is a small primary OS drive with a large secondary drive.
For instance, on my Alienware laptop, the primary hard drive is a 256GB SSD and the secondary hard drive is a 1TB physical hard drive. Since the primary drive holds the OS, your user folders (e.g. Documents, Downloads, Music and Videos) as well as any installed applications, this can quickly fill these smaller drives.
To help alleviate this situation, we are going to move the user folders (Documents, Downloads, Music and Videos) to the secondary hard drive. If this is not done correctly though, applications that look for these files will just think they’re missing and future files will continue to be stored on the small primary drive. This article will walk you through the steps to perform this move properly so that this won’t occur.
How to Move User Folders
Note: Determine which user folders you want to move first. You may move one or more of the following folders, Documents, Downloads, Music, Pictures and Videos. Perform the following steps for each of these folders.
- Open File Explorer (Windows Key + E).
- Navigate to the parent location you want to move the user folders to (e.g. D:\MyFiles).
- Create a destination folder for the user folder you want to move (i.e. Documents, Videos, etc.).
- Example: D:\MyFiles\Documents
- Navigate to your user folder.
- If you know your user name, you can navigate to C:\Users\{YourUserName}.
- If you don’t know your user name, type %HomePath% in the location bar and press Enter.
- Right-click the folder you want to move and select Properties from the context menu that appears.
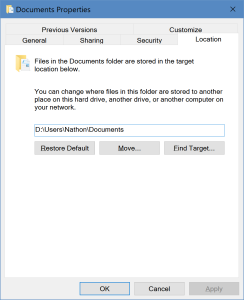
- Select the Location tab.
- Click the Move button.
- In the open folder dialog box that appears, navigate to the destination folder created in step #3.
- Click the Select Folder button.
- Click the OK button.
- In the dialog box that pops up, click Yes to move the files from the old location to the new location.
- Repeat for each user folder you wish to move.
Summary
That’s it! You’ve created a new place to store your files, told Windows to start storing files there instead and moved all of the files from the old folder to the new one! I hope this article helped you out. There are many more articles like this on my blog. Please check them out! If you have any questions or comments, feel free to leave me a comment.
