Move Windows User Folders to Another Drive
Posted by Nathon in Tips & Tricks on September 30, 2016
 Overview
Modern computers are often coming with a small solid state drive (SSD) for the primary operating system (OS) and then an additional standard or physical hard drive to provide more storage. Since SSDs are typically much smaller than their non-solid state counterparts, this can cause problems with the SSD drive running out of space. This issue isn’t just applicable to SSDs though. This can apply to any system where there is a small primary OS drive with a large secondary drive.
For instance, on my Alienware laptop, the primary hard drive is a 256GB SSD and the secondary hard drive is a 1TB physical hard drive. Since the primary drive holds the OS, your user folders (e.g. Documents, Downloads, Music and Videos) as well as any installed applications, this can quickly fill these smaller drives.
To help alleviate this situation, we are going to move the user folders (Documents, Downloads, Music and Videos) to the secondary hard drive. If this is not done correctly though, applications that look for these files will just think they’re missing and future files will continue to be stored on the small primary drive. This article will walk you through the steps to perform this move properly so that this won’t occur.
How to Move User Folders
Note: Determine which user folders you want to move first. You may move one or more of the following folders, Documents, Downloads, Music, Pictures and Videos. Perform the following steps for each of these folders.
- Open File Explorer (Windows Key + E).
- Navigate to the parent location you want to move the user folders to (e.g. D:\MyFiles).
- Create a destination folder for the user folder you want to move (i.e. Documents, Videos, etc.).
- Example: D:\MyFiles\Documents
- Navigate to your user folder.
- If you know your user name, you can navigate to C:\Users\{YourUserName}.
- If you don’t know your user name, type %HomePath% in the location bar and press Enter.
- Right-click the folder you want to move and select Properties from the context menu that appears.
- Select the Location tab.
- Click the Move button.
- In the open folder dialog box that appears, navigate to the destination folder created in step #3.
- Click the Select Folder button.
- Click the OK button.
- In the dialog box that pops up, click Yes to move the files from the old location to the new location.
- Repeat for each user folder you wish to move.
Summary
That’s it! You’ve created a new place to store your files, told Windows to start storing files there instead and moved all of the files from the old folder to the new one! I hope this article helped you out. There are many more articles like this on my blog. Please check them out! If you have any questions or comments, feel free to leave me a comment.
Windows 10 Activation Failure
Overview
When attempting to activate volume license versions of Windows 10 you can often end up experiencing problems. This article will explain how to determine if this is the problem you’re experiencing as well as how to successfully activate Windows.
The Symptoms
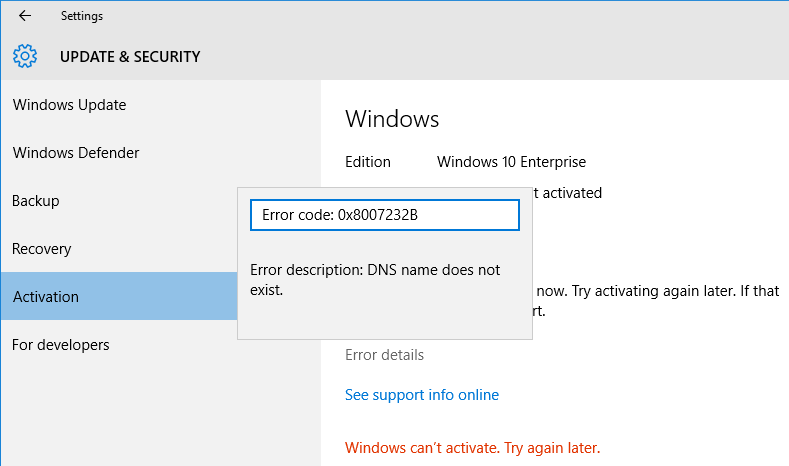
With this issue, when you attempt to activate a volume license version of Windows 10 you receive the following screen saying that Windows can’t activate.

Upon further investigation, we click the Error Details link and are presented with an “Error Code: 0x8007232B” as well as a message saying “Error Description: DNS name does not exist.”
For this particular issue Microsoft says you could see any one of the following messages.
Error Message 1
Activation Error: Code 0x8007232b
DNS Name does not exist
Error Message 2
Windows could not be activated.
Key management services (KMS) host could not be located in domain name system (DNS), please have your system administrator verify that a KMS is published correctly in DNS.
Error: 0x8007232b
Description: DNS name does not exist.
Error Message 3
Error: 0x8007007B
The file name, directory name, or volume label syntax is incorrect
This problem can manifest itself when using the following Windows volume license media.
- Windows 10 Pro or Enterprise
- Windows 8.x Pro or Enterprise
- Windows 7 Enterprise
- Windows Vista Enterprise
- Windows Vista Business
- Windows Server 2012
- Windows Server 2012 R2
- Windows Server 2008
- Windows Server 2008 R2
The Solution
The underlying issue is that Windows is attempting to find a Key Management Service (KMS) via DNS. When it can’t find a KMS server it returns the message indicated above. From here there are two ways to get Windows activated.
Manual Activation
- Open a Command Prompt in Administrator mode (right-click Command Prompt, Run As Administrator)
- Type “slmgr /ipk {key}”, where {key} is your key number, and press Enter.
- Example: slmgr /ipk 12345-12345-12345-12345

- Example: slmgr /ipk 12345-12345-12345-12345
- You should receive a message saying Windows was successfully activated.
- Click OK.
- Close the Command Prompt.
- If your System dialog is open, close and re-open it to see that Windows is activated.

Setup KMS Server
The other way to get Windows activated is to setup a KMS server. This article from Microsoft describes the process in detail.
Activate using Key Management Service
https://technet.microsoft.com/en-us/itpro/windows/deploy/activate-using-key-management-service-vamt?f=255&MSPPError=-2147217396
Summary
I hope this helped you get your system activated. If you have any questions, please feel free to leave a comment below.
Flashing Screen & Hyper-V in Windows 10

Flashing Screen & Windows 10
As of the time of writing this article, I have just received my new laptop. This system is to replace my primary HP laptop that died a few months ago after being in faithful service for over 10 years. Here’s what I got.
System Specifications
- Alienware 17 R3
- Microsoft Windows 10 Professional
- Intel Core i7-6820HK (Quad-Core, 8MB Cache, Dynamically Overclocked up to 4.1GHz)
- 32GB Dual Channel DDR4 2133Mhz (16GBx2)
- 256GB PCIe SSD (Boot) + 1TB 7200RPM SATA 6Gb/s (Storage)
- NVIDIA(R) GeForce(R) GTX 980M with 8GB GDDR5
- 17.3 inch UHD (3840 x 2160) IGZO IPS Anti-Glare 400-nits Display (4K)
- Intel 8260 2×2 802.11ac 2.4/5GHz + Bluetooth4.1
- 8 Cell 92Wh Battery
- Customizable RGB Keyboard
- Xbox 360 Controller (Black)
Needless to say, I love it! I’ve been playing Fallout 4 on it with graphics set to Ultra and it doesn’t even break a sweat. The fan is barely audible during normal operation. It really kicks up when working hard, but that’s necessary to keep things cool and prolong component life. I loaded some software that I commonly use and everything was going well. That’s when it happened.
Screen Flickering
I was going to install a Linux VM and was deciding between the trusty old VMWare and Microsoft’s Hyper-V. I did some reading and saw that Hyper-V supports Ubuntu and has native CPU support, so I figured I’d give it a try. I added the Hyper-V components in Windows Features, as well as some other items I’d need for development work (IIS, ASP.NET support, etc.) and then restarted my system.
Upon coming up to the login, the screen started flashing / flickering. I thought it was strange, but maybe some things are still kicking off from the reconfiguration. Once I logged in though things got worse. There was a messed up bar flashing down the left side of the screen and the entire screen kept jumping and flickering. It looked for all the world like a hardware issue (cables loose, bad video card, bad screen, etc.).
At this point I was NOT happy! I thought, here I have a brand new $3,100 laptop (before discounts) that has failed on its 2nd day of use! However, I figured that it was far too coincidental that this happened immediately after I’d just made a software change, so I started uninstalling the components I’d just enabled. I removed them one at a time, rebooting after each uninstall. Of course I left Hyper-V until last since I figured it was the most likely software culprit. Nothing worked until I uninstalled Hyper-V. After that everything went back to normal and I haven’t had a problem since.
The Problem
Now keep in mind that I have a couple of decades of experience (just helping illustrate the following point) and to me this problem was IDENTICAL to a loose video component or cabling. It was so similar that had it occurred at any other time I would have sworn it was a hardware issue and would be pursuing a replacement right now. When I started researching this issue I found that this is in fact what others have done. I’m writing this article to hopefully clarify the source of the problem.
There are several resources online discussing various ways to troubleshoot this. However, what they all have in common is isolating software components to determine which is causing the problem. What this all really boils down to is software compatibility with Windows 10. Each of these resources takes a different approach to determining which piece of software or driver is not playing nice with Windows 10.
Apparently Microsoft knows about the problem and offers the following article to troubleshoot flickering in Windows 10.
Microsoft: Troubleshoot Windows 10 Screen Flickering
They suggest that either one of three software components and/or video drivers are typically to blame. The software packages that they specify can cause problems are Norton AntiVirus, iCloud and IDT Audio. If you have one of these Microsoft recommends removing them to see if that resolves the issue. The process for video card issues is a bit more involved but generally involves updating drivers and if you have multiple display adapters, isolating which is causing the problem by disabling them one at a time.
Other 3rd party articles provide different ways to achieve a similar main purpose… isolate the software component and disable or remove it.
Techdows – Turn off Windows problem and error reporting services
Windows Report – Isolate boot software components to determine which is causing the problem
Make Use Of – Basically a reiteration of Microsoft’s steps
In Summary
Long story short, it’s a simple software incompatibility. You just need to get to the bottom of which piece of software is causing it and remove or update it. For me it was Hyper-V, but for you it could be something else. Now keep in mind that this is not a means to fix actually broken or defective hardware. Using some common sense though you could probably determine the difference. If you just upgraded to Windows 10 or installed some software when the issue started then it’s probably a software issue. However, if your system has been running flawlessly for quite some time with no changes being made and then it starts, then chances are it’s hardware.
I hope this article helps you get to the bottom of whatever the cause might be!
[Update]
It turns out that this problem was due to an older BIOS version. After applying the latest update Hyper-V is working perfectly.
Guide to Building a Hackintosh
Posted by Nathon in Miscellaneous on December 5, 2015
I came across this article on building a “Hackintosh”. According to the article “A hackintosh is simply any non-Apple hardware that has been made—or “hacked”—to run Mac OS X.”
Now I’m not a big Apple fan. I run mostly Microsoft technologies (yes, I’m a bit of a fan boy) and some Linux systems as well. However, as a technology person my goal is to learn as much as I can about everything I can. For that reason I’ve always wanted a Mac in my arsenal of systems.
Apple products are typically pretty expensive, especially for something I don’t use regularly. However, I’ve got plenty of PC clones laying around not doing much. This should allow me to use one of them.
Article on LifeHacker
http://lifehacker.com/the-always-up-to-date-guide-to-building-a-hackintosh-o-5841604

GPS Tracking is a Search!
Posted by Nathon in Miscellaneous on March 30, 2015
![]() The U.S. Supreme Court ruled today (March 30, 2015) that if the government puts a GPS tracker in any of your personal effects, it constitutes a search and is governed by the 4th amendment. This is a huge win for privacy, over-invasive government and personal freedom.
The U.S. Supreme Court ruled today (March 30, 2015) that if the government puts a GPS tracker in any of your personal effects, it constitutes a search and is governed by the 4th amendment. This is a huge win for privacy, over-invasive government and personal freedom.
You can read more about the ruling in this ruling for Torrey Dale Grady vs. North Carolina.
http://www.supremecourt.gov/opinions/14pdf/14-593_o7jq.pdf
You can also read this article on the subject by The Atlantic.
Remove Unwanted SameTime Statuses
Posted by Nathon in Communications on March 9, 2015
The IBM® SameTime Connect client allows you to customize the messages that show when you’re in different statuses (e.g. available, away, in a meeting, etc.). However, the interface provides no way to remove any customized messages you’ve created unless you want to “Restore Defaults” and remove all of them.
These messages are stored in a simple XML format so they are easy to edit. When you want to remove a status follow this process.
- Open Command Prompt.
- Type echo %appdata% and press Enter.
- Note this location and use it in place of {ApplicationData} in the path below.
- Open Windows Explorer.
- Navigate to {ApplicationData}\Lotus\Sametime\.metadata\.plugins\com.ibm.collaboration.realtime.community.sametime
- Edit the community-config.xml file in a text-only editor such as Notepad.
- As always, if the file is important create a backup first.
- Delete the entire line corresponding to the message you wish to delete.
- Save the file.
- Exit and Restart SameTime.
Note: You should only use a text-only editor like Notepad. Editors like Microsoft Word add formatting and control information to the file. This could inadvertently cause the application to consider it corrupted.
NSA “Equation group” Puts Spyware in Hard Drive Firmware
Posted by Nathon in Great Articles on February 18, 2015
 Here we go again! My previous article “10 Ways the NSA Spies on You” showed how the NSA has been listening and recording through your mobile phone for years (“Clapper Program”) whether it’s on or off. Of course U.S. District Judge William Pauley said in a 53 page ruling that it was legal as long as they do it to everyone.
Well the NSA never ceases to amaze me. Now Moscow-based security software maker Kaspersky Labs has found spyware hidden inside the firmware of hard drives made by most major manufacturers. Those found to contain the spyware include Western Digital, Seagate, Toshiba, IBM, Micron Technology and Samsung. Experts agree that the NSA would have required the source code for the hard drive’s firmware in order to embed the malicious program in it. That’s easy though. They say the Pentagon wants a bunch of hard drives, but the NSA has to review the source code for security purposes and bingo they have the source code.
Over 30 countries have been found to be infected with the spyware including Iran, followed by Russia, Pakistan, Afghanistan, China, Mali, Syria, Yemen and Algeria. The targets included government and military institutions, telecommunication companies, banks, energy companies, nuclear researchers, media, and Islamic activists.
This is now costing the US because foreign governments don’t want to purchase our hardware for fear it’s been corrupted with NSA spying technology. Peter Swire, one of five members of U.S. President Barack Obama’s Review Group on Intelligence and Communications Technology, said the Kaspersky report showed that it is essential for the country to consider the possible impact on trade and diplomatic relations before deciding to use its knowledge of software flaws for intelligence gathering. “There can be serious negative effects on other U.S. interests,” Swire said.
C# WMI Tutorial
Overview
I recently had a project where I was writing an agent that would collect data from various servers on the network. I needed information like the server name, IP address, OS drive, free and total space on the OS drive, Windows folder and so on. In addition to this I also needed to be able to collect information on specific files on each server as well as registry information from particular registry keys on each server. This would all be consolidated into a database and referred to at a future date.
In order to gather this information I turned to using WMI (See Background & Terminology below) within a C# application. The problem is that none of the research I performed turned up very good information on how to use WMI within C# and what was available to gather from within WMI.
This tutorial will provide a step-by-step process to follow in order to use WMI. It will provide information about the tools you need, how to use them and finally how to code to get information from WMI.
Background & Terminology
This article deals with coding for and consuming WMI (Windows Management Instrumentation). WMI is a set of extensions Microsoft created to provide instrumentation (measurement) information from within Windows. However, WMI is a Microsoft-specific set of extensions that are actually built upon the WBEM (Web-Based Enterprise Management) and CIM (Common Information Model) standards developed by the DMTF (Distributed Management Task Force).
The WMI set of instrumentation comes pre-installed in all Windows 2000 or newer operating systems from Microsoft and can be downloaded for older OS’s like Windows NT, 95 and 98. It’s powerful because it can be utilized by languages like VBScript, PowerShell and .NET to manage the operating system and gather a wide variety of information on it.
WBEM Test Tool
You’re going to need to become familiar with a tool called WBEMTest. This tool is pre-installed, along with WMI, on Windows 2000 and newer operating systems from Microsoft. To run it do the following.
- Open Run dialog (Win+R, Start->Run, etc.).
- Type ‘wbemtest’ and click OK.
The following dialog will appear.

There are three things we need to know before using this tool. First you must connect to a WMI repository in order to pull anything from WMI. The default namespace you’ll be using is generally “root\cimv2”. Also, similar to .NET there are classes and instances of those classes. The class itself only defines what type of information might be provided in any particular instance of that class. The instances contain the information itself. To more fully understand this we’ll run through some examples.
Example 1: Obtain Drive Information
- Open WBEMTest as noted above.
- Click Connect.
- Ensure the Namespace is set to “root\cimv2” and click Connect.
- Click Open Class.
- Enter “Win32_LogicalDisk” and click OK.
- Info:
- The Properties (middle) list shows the information you can obtain from each instance.
- Click Instances.
- Info:
- The list will show all instances of Win32_LogicalDisk (drives) on your system (C, D, E, etc.).
- Notice the list shows the “DeviceID” property is what is set to the drive letter.
- We will gather information on the C drive (DeviceID=”C:”).
- Click Close and Close again to get back to the main window.
- Click Open Instance.
- Enter Win32_LogicalDisk.DeviceID=”C:” and click OK.
- Info:
- The Properties windows now contains information for each property in the class as it relates to the C drive.
- Later we will obtain information in C# on one of these properties.
- We’ll need to note the class (Win32_LogicalDisk), the DeviceID (C:) and the property name we want (“FreeSpace”).
Example 2: Obtain Windows Information
- Open WBEMTest as noted above.
- Click Connect.
- Ensure the Namespace is set to “root\cimv2” and click Connect.
- Click Open Class.
- Enter “Win32_OperatingSystem” and click OK.
- Info:
- The Properties (middle) list shows the information you can obtain from each instance.
- Click Instances.
- Info:
- The list will show all instances of Win32_OperatingSystem on your system.
- Notice the list doesn’t show anything behind Win32_OperatingSystem other than the “@” sign.
- We will gather information on this default OS instance (@).
- Click Close and Close again to get back to the main window.
- Click Open Instance.
- Enter “Win32_OperatingSystem=@” and click OK.
- Info:
- The Properties windows now contains information for each property in the class.
- Later we will obtain information in C# on one of these properties.
- We’ll need to note the class (Win32_OperatingSystem) and the property name we want.
Get WMI Information in C#
Now we will code the two examples above in order to obtain the information from the properties we saw in the examples. We will start with example 1. In this example “Win32_LogicalDisk” is the class we’ll be looking at.
- Create a new C# Console Application in Visual Studio.
- Add “System.Management” to the project references.
- Add a “using System.Management;” statement to the top of the Program.cs file.
- Perform the remaining steps inside the Main method (or wherever you want it).
- Define your query (what you want to return from WMI).
var dskQuery = new SelectQuery("Win32_LogicalDisk", "DriveType=3"); - Define your scope (what system you want to connect to and WMI path).
var mgmtScope = new ManagementScope("\\\\COMPUTERNAME\\root\\cimv2"); - Connect to WMI.
mgmtScope.Connect(); - Define a searcher for the query.
var mgmtSrchr = new ManagementObjectSearcher(mgmtScope, dskQuery); - Call searcher’s Get method and loop through results.
foreach (var disk in mgmtSrchr.Get()) { - Get the DeviceID of the current loop item and compare to the drive we want info on.
var devId = disk.GetPropertyValue("DeviceID").ToString();
if (!string.IsNullOrEmpty(devId) && devId == "C:") { - Get the value of the property we want (FreeSpace) and validate.
var freeWmi = disk.GetPropertyValue("FreeSpace").ToString();
var freeInt = 0;
if (!string.IsNullOrEmpty(freeWmi) && int.TryParse(freeWmi, out freeInt)) {
Console.WriteLine("Free Space on " + devId + " Drive: " + freeInt.ToString());
}} - Close out the for-each loop.
}
The second example is coded as follows in order to get operating system information from the single default instance. In this example “Win32_OperatingSystem” is the class we’ll be looking at.
- Create a new C# Console Application in Visual Studio.
- Add “System.Management” to the project references.
- Add a “using System.Management;” statement to the top of the Program.cs file.
- Perform the remaining steps inside the Main method (or wherever you want it).
- Define your query (what you want to return from WMI).
var osQuery = new SelectQuery("Win32_OperatingSystem"); - Define your scope (what system you want to connect to and WMI path).
var mgmtScope = new ManagementScope("\\\\COMPUTERNAME\\root\\cimv2"); - Connect to WMI.
mgmtScope.Connect(); - Define a searcher for the query.
var mgmtSrchr = new ManagementObjectSearcher(mgmtScope, osQuery); - Call searcher’s Get method and loop through results.
foreach (var os in mgmtSrchr.Get()) { - Get the value of the property we want (Version) and validate.
var osVer = os.GetPropertyValue("Version").ToString();
if (!string.IsNullOrEmpty(osVer))
Console.WriteLine("OS Version: " + osVer); - Close out the for-each loop.
}
Summary
The only remaining thing left to do is to determine what all of the Classes are that you can gather information on. This site contains WMI Class Information by the type of information you want. Keep in mind security considerations when trying to open remote WMI repositories. You can find more about maintaining WMI Security here.
I hope this help you get the entire picture of how to find and consume WMI information.
Connecting to Integration Services Failed with “Access Denied”
Posted by Nathon in SQL Server on December 17, 2014
Overview
Today, when trying to connect to my local SQL Server Integration Services instance for the first time I received an error message.

It was a new installation of SQL 2012 so I didn’t know for sure that it was even running. I checked to verify that SSIS was actually installed and that the service was running. I also verified DCOM permissions for MsDtsServer100 and added myself to the Distributed COM Users group, even though I am a local administrator. Of course none of that worked.
However, after a little looking I was able to find some talk about User Account Control (UAC) potentially causing this issue. UAC is able to intercept requests for administrative access and ask you about them before they’re allowed or terminate them all together. In this case it was terminating the request and SSMS was returning an Access Denied message.
To fix this problem you have one of two options. First you can close SSMS then right-click the icon, selecting Run as Administrator, each time you want to run it and connect to SSIS. The second option is to disable UAC. Of course this poses additional security risks since you’ll no longer be notified of requests for administrative access. However, if you want to do this the instructions are below.
Disabling UAC
- Click Start and then Control Panel.
- Click User Accounts and then User Accounts again in the next window.
- Click the Change User Account Control settings link.
- Slide setting down to “Never notify” and click OK.
- Restart your system.
Delete Visual Studio Online Project
Posted by Nathon in Visual Studio on November 19, 2014
Overview
I recently had a project that I wanted to remove from my Visual Studio Online source control system. I hadn’t done this before so I went about attempting to remove the projects via the normal means. Here is how I went about it.
Trial and Error
Naturally I first logged into my Visual Studio Online account, opened the project in the Collection Administration page and searched for some way to delete the project. However, I found that there was no available way to do this.
The next thing I tried is to delete the project from within Visual Studio 2013. I connected to my Visual Studio Online source control system, opened the Source Control Explorer and found that there was an option to right-click the project and select Delete. Of course it wasn’t that easy though. Upon selecting Delete the following error dialog appeared.

Error displayed when trying to delete a Visual Studio Online project locally.
Now I’m the administrator of the entire site so I knew permissions weren’t an issue. It also surprised me that there was an option to delete a project from within Visual Studio, but that it wasn’t supported. I tried searching the Visual Studio Online support pages. I did find entries for deleting projects from Visual Studio Online. However, all of them directed me to pages for removing projects from within Visual Studio itself. Then I stumbled upon another article that showed me what I was missing.
How to Delete Projects
It turns out I was actually pretty close the first time. Here is how you delete a project from your Visual Studio Online account.
- Login to your Visual Studio Online account (you must be an admin).
- Click the gear to the right of your name in the upper-right hand corner.
- In the Control Panel page, hover over the project name and then click the 3 dots that appear to the right of the name and select Delete.
- Type the name of the project and click the button to confirm.
- The dialog will tell you that it will be scheduled for deletion; click the button to close the dialog box.
- Click the refresh button on the project list (circular arrow) occasionally to check for when the project has been deleted.
Summary
That’s it! The project has now been deleted. The part I missed was step 4 (right-clicking the project name). It seems silly now that I wouldn’t try that. I guess I don’t generally expect web pages to have right-click functionality. There’s also nothing that I found to indicate that this functionality is available or how to do it. Now you know!
